|
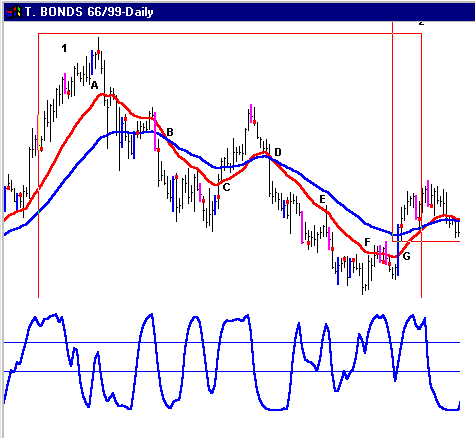
This is the
same panel as the earlier number 1 with the Bressert Double Stoc and the
mechanical buy/sell signals plotted on the chart. A rise above the sell
line (the upper horizontal line in the oscillator) followed by a downturn
paints the price bar purple to indicate a possible sell setup, and an
entry signal is generated when the low of the purple setup bar is taken
out. Sell signals are not taken when the red EMA is rising and the difference
between the red and blue is expanding.
At "A" a
buy setup bar is generated following a drop below the lower horizontal
buy line and an upturn in the oscillator. A rise above the setup bar generates
a buy signal, which occurred at the top of the cycle. This is not a buy
signal that would be taken. The red EMA continues down as the trading
cycle bottoms are indicated by the blue setup entry bars; however, buy
signals are not taken against a declining, red EMA unless the longer-term
trend is clearly up, which is not the case here.
Just before
"B", a sell signal is generated following the trading cycle top that was
followed by a decline into a trading cycle bottom. The blue setup bar
and entry signal would have been used to take profits, but not to go long
as the trend was clearly down.
The buy signal
at "C" might have been taken depending upon the longer-term cycle, timing
bands and other technical analysis. The purple sell signal at the trading
cycle top before "D" could have been taken as the price level stopped
at resistance. Also, the red EMA did not continue expanding above the
blue, and instead formed a fingertip as prices continued sharply lower
as the red EMA continued to decline faster than the blue.
The two blue
setup bars before "F" indicate a potential bottom, but would not be tradeable
buy signals because the market is in a clear downtrend. The sell signals
following "F" could have been taken; however, the sell signal is not as
dynamic as the sell signal at "E" in which prices rose above the expanding
red line to be followed by a sharp decline. At "F" the expansion stops,
and the distance between the two EMAs narrows. But this does set the stage
for a buy out of the cycle bottom near "G", which is a retest of the low.
|